Showing posts with label Craft. Show all posts

Tuesday, April 02, 2013

Tuesday's Tips & Tidbits: the Tooth Fairy

TOOTH FAIRY
A rite of passage in our culture
It's a big deal to lose that first tooth
Just ask any kindergarten teacher.

My son has his first two wiggly teeth: the bottom, front ones---like most kids. 
 
He's been coming home from school since the beginning of the school year telling me who lost their tooth, how, and that the kid got a prize from his teacher's special prize box for losing a tooth.
 
He's anxiously awaiting his own teeth falling out because 
IT'S SOOOOO COOL!!!!!!

When I was a little girl my mom would make us each a
Tooth Fairy Pillow. 
I didn't realize at the time how brilliant my mother was. 
This pillow had a little pocket in the front where we'd put our tooth. 
We'd place the pillow on our bed, and wake up the next morning to money in exchange for that tooth. 
 
My. brilliant .mother!!! 
 
*She didn't have to carefully dig under my pillow trying to find the tooth.
 
*She didn't have to worry about waking me up.
 
*She didn't have to worry about morning when the money she'd left had fallen down the side of the bed and a kid was crying because the Tooth Fairy stole their tooth and didn't leave any money.
 
My.brilliant.mother!!!!

So, I made my son a Tooth Fairy pillow this week. 
Preparation for the big night when he sells his teeth to that sneaky Tooth Fairy.

I should have asked "What color of pillow do you want?" 
Not "What kind of pillow do you want?" 
One word can really complicate life! 
He wanted a Mario Pillow. Of course! Why did I ask?!? I felt pretty intimidated at first, but it did turn out and was easier than I expected once I had an idea of how to do it. 
 

The sad part to this story
When I was almost done with his pillow, he looked me right in the eyes with a very serious thoughtful look and said, "Mom, the Tooth Fairy isn't real is He?"
My response, "Why would you think that?"
My son replied, "Heavenly Father didn't make fairies." A long pause while I tried to figure out what to say.  Then he added, "But I LOOOOOOVE my cool pillow.  And I'm still so excited to lose my teeth!  It'll be SOOOOOO COOL."

I'm sad he didn't even make it through one round of the Tooth Fairy while believing.  But I'm happy he's still excited. 

P.S.  The night before Easter he told me he knows it's me and Dad who hide the eggs, that the Easter Bunny isn't real.  It was still his most exciting Easter morning and he was crazy uber happy about searching out all the eggs. 
I've learned a good lesson from him I need to remember always: 
When the fairy tale is gone, reality is still a lot of fun!
 

******And, ONE MORE TIP******
No matter how much money your Tooth Fairy gives, give it in coins, not bills.  A kid feels a lot more rich with 4 quarters in his pocket than with one dollar bill in his pocket.  I Promise!

Thursday, January 19, 2012

Thing to Do: Snowflakes

Many of YOU are in the middle of a big snow storm. 
I am not. 
I do not know what kind of snow is falling for you....meaning if it's slushy, clumpy, melting before it hits the ground, or super frozen individual flakes.  But if any of you have the super frozen individual flakes ENJOY!!!!! 

Have you ever stood outside and let the snow fall on the sleeve of a dark coat or glove and been amazed at the unique beauty and design of each flake?  If not, YOU.ARE.MISSING.OUT!  A few weeks ago we had that kind of snow.  My FAVORITE!!!  My 5 year old went outside with me and I explained snowflakes to him and he also loved watching them fall on his gloves, well, for about 20 seconds and then it was snowball fight time.  But seriously, take a few minutes to admire the beauty.   Then have a little snow fun.  

OR

Make some paper snowflakes.  Do you remember how?  If not, here's an easy tutorial: 6-Point Paper Snowflake  (much easier to link it than do my own photo gallery of steps).  Tape them in your windows and enjoy.  We have some in our front window-- helps us pretend we have snow.

Thursday, November 04, 2010

Thursday's Thing to Do: Paper Plate Tambourine

can you tell it's well loved?
WHAT YOU'LL NEED:
- 2 paper plates for each tambourine
- Stapler and Staples
- Dry rice, beans, or macaroni, etc.
- Things to decorate (crayons, stickers, or any other fun crafty things you have around the house)

HOW TO MAKE IT:
1.  Lay one plate on the table, put in about 1/8 cup of dry rice, beans, or whatever else you think would sound awesome when shaking it.
2.  Lay other paper plate on top (so the middle area is hollow) and staple around the edges to hold it all together.
3.  Let kids decorate as they please. (if using glue, make sure it's dry before playing with it.)
4.  Play music, make up songs, turn on the radio and dance and play the tambourines...just have fun and be creative!!!

***Note: I use paper plates instead of plastic, because the plastic ones sometimes have sharp edges and could cut little hands.

Thursday, October 21, 2010

Thursdays Thing to Do: Fingerprint Art

WHAT YOU'LL NEED
Paper
Ink pad
Markers, Pencils, Crayons, etc.

HERE'S HOW
1.  Roll your finger or thumb over the ink pad.
2.  Make a print by firmly pressing the inked finger or thumb against the paper. Use different fingers to make prints of various sizes.
3.  Wash your hands and allow the prints to dry for a few minutes. Then draw faces and other details on the prints.

Thursday, September 09, 2010

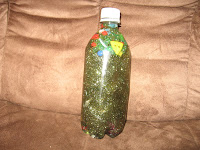
Thursday's Thing to Do: Search a Shape bottle

Kids will love helping you make this craft!!!

What you'll need:
* 1 clear plastic bottle with a screw on lid (a water bottle or similar size)
* Glitter (I used green, that's why it looks so murky)
* Corn Syrup
* Water
* Stuff to put in the bottle.  (Ex: beads, buttons, penny, basically any item that won't fall apart when it's in the water.  Some good places to look are your own craft supplies, old game pieces, and dollar stores.)
* Super Glue or similar permanent glue

How to make it:
1. Clean the bottle out
2. Fill the bottle with several items you've collected (don't fill it too much though, or the items will be too crowded.)
3.  Add some glitter, about 2-3 Tbl., depending on the size of the bottle
4.  Fill remaining space with Water and Corn Syrup (1/3 Corn Syrup-2/3 Water).  Be careful to not have it overflow, don't fill it to the rim.
5.  Glue the lid on and let it dry
6.  Shake it up and ENJOY!   

-A baby will enjoy watching the sparkle and color. 
-With a young child you could begin having them search for colors and shapes as you point them out. 
-For an older child, they can search and find on their own.
*Thanks for this idea Becky!